

Supplies:
THIS animation (also found on my freebies page)
Scrap is Love Me available at CDO
Tube is from Enamorte
Mask is from my collection here on this blog. I am using 246 and 248 from package 5.
Font is Angie’s Dean. I am using Glyphs of this font. For more information, check out this tutorial.
Please do not use any of the licensed supplies without purchasing them first.
First off, unzip all supplies.
Open the mask you would like to use. You don’t have to use the one I have chosen.
Select > All
Edit > Copy
Select > Edit in Quick Mask Mode
Edit > Paste
Select > Edit in Quick Mask Mode (uncheck)
Layer > Layer Mask > Reveal Selection
Layer > Layer Mask > Apply
Layer > Matting > Remove Black Matte
Right click the layer thumbnail in the layers panel
Select Pixels
Layer > Layer Mask > Reveal Selection
Layer > Layer Mask > Apply
Save this as a .psd on your desktop (or wherever you want)
Open a new canvas. I always use 800×800 pixels. Be sure your resolution is 72 Pixels/Inch.
I usually add a color fill layer to the tag so it is easily changed should I use it on a different color website. Layer > New Fill Layer > Solid Color…
White usually works with most websites.
You can drag and drop items straight from your file browser into the canvas.
Browse to the mask that you just saved in your computer’s file browser. Drag it onto your tag.
Don’t forget to set the Transformation by double clicking the layer on the canvas, or clicking the checkbox at the top of the window.
Next, choose the paper you would like to use on your mask.
Drag the paper onto the canvas above the mask.
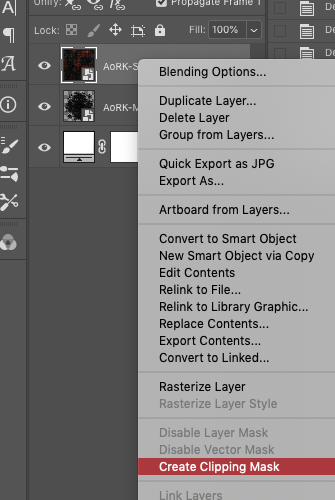
In your layers panel, right click on the paper layer and choose Create Clipping Mask.
Now, time for the elements!
Instead of telling you exactly where to put what and what size to use, I am just going to show you a animated image of what I did.

As you can see, it is pretty random. I just place the items where I think they might work.
Now, back to the frame element layer. We need to add a fill to the picture frame.
Highlight the layer UNDER the frame in your layers panel. Now drop the paper you would like to use onto the canvas.
Grab your selection wand from the tools panel. If you can’t find it, check out the basics page for a better understanding of the tools layout.
The wand options should look like this at the top of your window:

Click on the center portion of the frame.
In the upper menu of Photoshop, click on Selection > Modify > Expand…
Expand your selection by 2px.
Now highlight your paper layer. Go to Layer > Layer Mask > Reveal Selection.
Now you have a fill to your frame.
We definitely want to add some shadows to our elements. Without shadowing, the tag will just look flat. The secret to a good tag, is a good shadow effect.
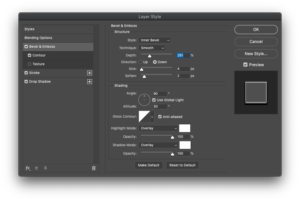
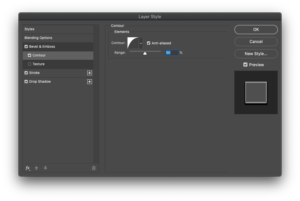
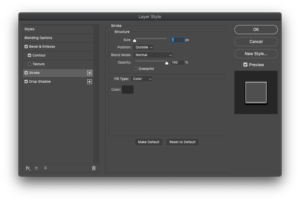
Right click a layer (topmost works fine) and choose “Blending Options.”
I add a drop shadow and an outer glow. It enhances the effect a bit.


Now after you have hit OK, right click the layer again and choose “Copy Layer Style.”
Highlight all of your layers (click the top one, then shift + click the bottom one) and right click again. This time, choose “Paste Layer Style.”
It makes a HUGE difference to add shadows:

Now that we have all of that done, time to add the next details. Tube and text. Fun!
Choose where you want your main tube to be placed.
Now drag and drop your tube onto the canvas. Resize and adjust it to your liking. Always make sure you constrain your proportions while resizing. Hold the Shift key while you drag the corners.
Add the same drop shadow you did before. Don’t forget your copyright text!
Highlight the top layer of the layers panel.
Grab your text tool and add the name you would like. Position it just where you want it and add a layer style. This is mine:

That leave us with the non-animated version of the tag! If you wold like to keep the JPG version, you can save here. Simply File > Save As… and choose the jpg option from the drop down box at the bottom of the dialog.

Here’s where it starts getting complicated.
Make sure your Animation Panel is open. Window > Timeline (or Animation, if you are on earlier versios)
You will need to click the “Create Frame Animation” button. If you do not see this button, please refer to THIS page for more information about the timeline.

You will see that your first frame is already there. But… ignore it! We don’t need it.
File > Open…
Navigate to the animation you saved from the supplies. To conserve space, we will be cutting the animation time in half.
You will see that all 25 layers are open and unhidden in the layers panel.
Highlight all of the odd numbered layers. Hold the ctrl/cmd key and click each one.
In the menu choose Layer > Group Layers
If you would like to use the entire animation, just highlight all of the layers and group them. This will affect the number of frames in your final tag.
Now right click on your group in the layers panel and duplicate. BUT DON’T HIT OK, YET!
In the duplicate dialog, choose your tag from the dropdown box. If you haven’t saved by this point, you should see an “Untitled-1” option. (but you definitely should have saved before now. Remember, always save often.)

After you have chosen your tag, hit ok. You can close the animation file without saving.
Back to your tag.
Your animation is below your frame layer, but above the frame interior paper layer, right? If it isn’t then you need to drag it to that position in the layers panel.

You can resize and rotate the group using the Edit > Free Transform option. Be sure you are resizing the whole group, not just one layer. Don’t forget to hit the check mark at the top of the window to apply the transformation.
I am not going to transform the animation.
Right click on the mask on that paper layer below your animation. Choose “Add mask to selection.” This will select the area of the mask.
Now highlight the group that your animation is in. Layer > Layer Mask > Reveal Selection. This will confine the animation layers to inside the frame.
On the right side of your animation panel, click the 4 horizontal lines. Choose the option that says “Make Frames from Layers.”
Now, this made a mess of things, didn’t it?? LOL! But no, not really. You will see that it created a frame for every layer in your tag. And that’s ok!

Click on the first frame in the animation panel. At the bottom of the window, there is a trashcan icon. That deletes the frame. Delete all of the frames that aren’t part of the animation. You should be left with 13 frames. (25 if you used the whole animation)

You will see that your tag only has one animation layer visible. You want this!
You can collapse the group again now, so you don’t mistakenly unhide layers in there. (click on the arrow beside the thumbnail of your group in the layers panel)
In the animations panel, click on the first frame. You MUST BE ON THE FIRST FRAME to do any kind of editing from here on out. ALWAYS make sure you are on the first frame. ALWAYS! I can’t stress that enough.
Are you on the first frame of the animation yet? Good. Now we can continue.
In the Layers panel, unhide the background layer.
Unfortunately, most of the time, that only unhides the last layer for the first animation frame. Just hide it again, and then unhide once more. Photoshop has a strange sense of background layers. It doesn’t play nice. Thankfully, the bottom-most layer is the only one you have to click 3 times. (I sure hope you got all of that. It is hard to explain…)
Now, one by one, unhide all of the layers to your tag. DON’T touch the animation layers, though! Those are already spaced out the way they should be. Leave those alone.
After you have unhidden all of your tag layers, you can click play at the bottom of the animation panel to check out your creation!
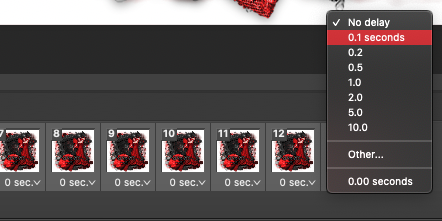
Oh, right! Don’t forget to set your frame delay.
Click on the first frame of your animation panel, and then shift+click on the last layer. Now click on that little arrow beside the time of your frames. I always choose 0.1 seconds, but you can choose as you wish.
Now you will need to save your animation as a gif file.

In your animation dialog, use these settings:

I hope you have enjoyed this tutorial!